Tuesday, January 16, 2018

BRUSHED MOTOR MAINTENANCE

                                   Beneficial Brushed Motor Maintenance


INTRODUCTION

Brushed motor mounted in RC Vehicle
The answer is no, it is not required but there are definitely some benefits for performing break-in and brushed motor maintenance.
Proper break-in and maintenance can improve performance and extend the life of the motor.
The break-in procedure basically seats the brushes to the commutator.
There are numerous opinions on how to properly  break-in a brushed motor, the most common being the wet method, in which the motor is placed into clean water, and ran for a period of time to seat the brushes, the water keeps the motor cool and actually flushes out any excess debris derived from the process.
As the motor is run, often in dirty or wet environments, good general maintenance practices can be utilized after running to maintain performance and longevity of the motor.
The purpose here is to give some good general  break-in and brushed motor maintenance practices to help users prolong the life of their brushed motors.

Breaking in a Brushed Motor
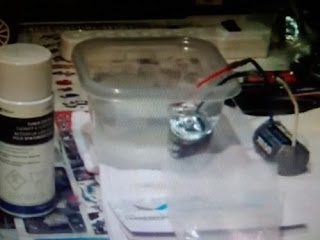
brushed motor maintenance
Breaking in Brushed Motor in Distilled Water

Note: These are the 2 most common methods used for break-in.
Wet Method - Never use this procedure on brushless motors
What you will need - Distilled Water or Rubbing Alcohol, Electronic Contact Cleaner,  Motor Bearing oil and 2  "D" size batteries with wire and alligator clips.
1)  First things first if your motor is mounted in your RC vehicle you will want to disconnect the wire leads and remove it from the motor mount, if you are replacing a motor go ahead and perform the break-in process before installing the motor.
Note: You may need to remove the pinion gear before you can remove the motor.
2) Pour some distilled water or rubbing alcohol into a cup( enough to submerge the motor). Next take a couple of D size batteries with wire and alligator clips, hook the wire leads up properly to motor for correct rotation, (you don't want to break the motor in reverse) D batteries are used to keep the motor speed down for proper break-in. The water acts as a lubricant, it keeps the motor cool and carries away the carbon particles as the brushes break-in.
3) Let the motor run 20 to 30 minutes.
4) Disconnect the battery leads from the motor, you will notice that the water is fairly dirty due to the carbon particles that have been carried away from the motor.
Applying Bearing Oil to Rotor Shaft Bushings
5) It is very important that you clean the motor and lube it after break-in. Take some electronic contact cleaner and spray it all over the inside of motor, (you don't want the motor to rust) until the liquid coming out is clear.
6) Apply a drop of bearing oil on the bushings or bearings of the motor shaft on the front and rear of the motor. Then apply a drop of oil on the inside of the motor on the commutator, and rotate the shaft by hand to distribute the oil.
7) Install the motor and set the gear mesh, many use the paper method for proper alignment.

Dry Method  
1) If your not comfortable with the wet break-in you can use the dry method. You will need to remove the motor and pinion gear (if required).
2) Get your battery and motor hooked back up as if it were in the RC vehicle.
3) You will now use the throttle trim on your transmitter to run the motor at an extremely slow speed, you don't want to run the motor at high speeds with a wet or dry break-in.
4) Let the motor run for 20 or 30 minutes.
5) Disconnect the motor.
6) Spray the whole inside of the motor with electronic contact cleaner until the liquid running out is clear.
7) As in the wet method, apply a drop of bearing oil on both ends of the motor on the bushing or bearing.
Apply 1 drop of oil on the commutator inside the motor, then rotate the shaft by hand to distribute the oil.
8) Install the motor and set the gear mesh according to specs.

GENERAL BRUSHED MOTOR MAINTENANCE


Traxxas Rustler RC Car in the Dirt
As drivers run and use their RC Models often in dirty, muddy, and wet environments a few periodic maintenance procedures can be utilized to maintain long term reliability and performance.
The type of conditions you run in will determine how often the motor will need to be cleaned.
If you have a motor with a sealed can, you will not be able to access the motor.
1) Remove the motor from the RC vehicle
2) Clean the exterior of the can with a soft bristle brush and cleaner, be sure to remove any dirt or debris around the bushing or bearings on both ends of the motor.
3) If you have access to compressed air you can blow the bulk of the dust and debris out of the motor with air, then clean the inside of the motor by spraying electronic contact cleaner into the various port holes until the liquid coming out is clear. Dry the motor off with towels.
4) Apply one drop of bearing oil on the bushings or bearings on each end of the motor, put a drop of oil on the commutator inside the motor. Spin the motor shaft a couple of times.
5) Install the motor and set the gear mesh to specs. (Paper method is common)

Final Thoughts
A brushed motor is not going to last forever, but with some preventative maintenance you give yourself a chance to get the maximum life out of your brushed motors.
Dirt, mud, dust, and debris will certainly shorten the life of the motor, some preventative maintenance can save you in the long run.


Thursday, January 4, 2018

HOW TO FLY A DRONE

                                                Learning to Fly a Drone


Drone Pilot Hovering his Drone


INTRODUCTION

Recently (the day after Christmas), I came across a few requests on social media from some in my local community who had apparently received a Drone as a Christmas gift, attempted to fly it and lost it.
They gave the location and brand name of the drone that had disappeared and asked those in the area to call if they happen to find it.
I felt bad for them, and realized they were trying to fly something they hadn't learned to control yet, when it got away from them, they probably lost orientation and subsequently lost their drone.
I began thinking back to my first flight with a drone and how I trained myself to fly and enhance my skills.
When it comes to flying a drone there are a series of steps you need to go through in order to learn to fly successfully, first of all it isn't going to happen over night.
In order to achieve drone flight successfully, you will need to do repetitive training with the various control features.
The purpose of this post is to give beginners a few tips that will hopefully help them learn to fly a drone without the heartache some have experienced.

Selecting a Drone 
First things first, if you are new to flying I recommend you take some time in choosing a drone that is suitable for a beginner, there are number of great choices on the market today.
I personally chose the Latrax Alias, number one it was affordable, it had an auto leveling six axis flight system, and 3 flight modes, Easy, Fast, and Expert.
Durable, with readily available replacement parts when warranted.
It was a great choice for me, I could learn to fly in easy mode and advance to fast and expert modes as my skill level increased without having to purchase another drone to advance.
It is a great sport flyer and will perform multiple flips, twists, and rolls for a more aerobatic flying experience.
I still enjoy flying it to this day.

TRAINING YOURSELF TO FLY

Location - when your learning how to fly a drone, you want to pick a location free of obstacles, like trees, buildings, roofs, swing sets etc.and more importantly places where a large number of people.tend to congregate (you wouldn't want to strike someone with the drone).
First Flight - Before attempting to fly make sure you know the control functions on the transmitter.
Taking off / Landing
how to fly a drone
Young Drone Pilot Flying his Drone

Find a level location to set the drone down on with the nose out, position yourself about 10' from the drone for safety purposes.
Remember use light inputs on the transmitter so you don't lift off like a rocket on a launch pad.
Lift the drone off the ground about 5 ' or so by pushing the throttle stick forward,  don't rotate the drone if at all possible, keep it pointed nose out,  then pull the throttle stick back, bring it back down and land it.
You may have to do this numerous times to get the feel of the throttle control.
As your skill level increases, you can keep extending your height until your confident that you can take off and land safely.
Hovering 
Holding a lightweight drone in a hover can be a challenge in windy conditions, but fairly easy to do in light to moderate winds.
Pick the drone up off the ground 5 ' or so and attempt to hold the drone in a steady position with the nose out, you may have to make slight adjustments on the flight stick to hold a steady hover if the drone tries to move around.  This to will take some practice but will help you get the feel of the flight controls.
After you feel comfortable with takeoffs ,landings, and hovering you can attempt the next step.
Flying Forward and Back 
When learning to fly, it is important that your stick movements are gentle, precise and not sloppy to ensure smooth performance from your drone. You definitely don't want to slam or jerk the flight sticks while learning to fly.
Lift the drone off the ground to a safe altitude, not to high though, push forward on the flight stick and push the drone out to 50 ft or so, then pull back on the flight stick and bring the drone back towards you. After you do this several times you can extend the distance outward but you want to keep the model within line of sight, you will need to do this repetitively until you are comfortable flying the drone out and back.

Pilot and his Drone
Flying Left to Right
Take off and Position the drone outward a safe distance in front of you, push the throttle stick to either the right or left and allow the drone to fly either direction with the nose positioned out., try not to turn the drone in any direction, as it will effect the direction of flight.  Again this will take some practice and can become repetitive, until you feel comfortable flying the drone to the left and right of your position.
For several weeks when I went out to fly, I would practice taking off, landing, flying forward and back, and right to left until I was confident I could perform them all safely. Learning how to fly a drone is a repetitive thing, and will come with some practice.
Note: All these training procedures should be performed within line of sight. Without FPV it is difficult to see the position of the drone at long distances.
Basic Rudder Turn
This is where flying can get a bit intimidating and confusing until you get your mind wrapped around it.
Some drones feature headless mode, meaning it doesn't matter which way the drones forward direction is pointing, when you push forward, the drone moves forward relative to your direction.
Lets put that aside and assume the drone you are flying does not have headless mode.
I found the easiest way to learn and practice turning is as close to your position as possible and not at long distance because you can see the position of the drone at all times and won't loose orientation.
Note: Pushing the throttle stick left or right (rudder) will rotate your drone. ( Referred to as Yaw in drone terms).
Take off as you learned previously, with the model directly in front of you push it forward 50 ' foot or so, then stop your forward movement, and rotate the drone (left or right ) 180 degrees until the nose or front of the drone is facing you. (keep in mind that when the drone is facing you the left and right (aileron) flight stick movements are now reversed )  push forward on the flight stick and fly the drone back to your position, stop forward movement,  rotate the drone 180 degrees with the nose facing away from you. At this point you have made 2 turns continue to practice repetitively until your comfortable, you can also extend flight distance as your skills are enhanced.
As you skill level increases you won't need to stop forward movement and just rotate your drone 180 degrees on the fly for a smooth clean turn. Your left and right (aileron) movements will come to you as you learn that when the drone is facing you the aileron inputs are reversed.
As you advance you can apply both rudder and aileron for a banked turn, which is smoother and faster.

In Closing
Be patient, if you fly regularly you will learn quite rapidly as you become familiar with the flight controls and flying characteristics of a drone.
If you continue to use these flight practices early on you'll be surprised how quickly you can master drone flight and improve your flying skills.